Saturday, August 1, 2015

My New Bespoke NiQUA Satchel


I don't know how or why, but one of my favorite things to do is hunting for nice bags to buy. I have my "episodes" about 3-4 times a year. It would take months before I would settle for the one (at least, for now).

I would never buy the branded ones for myself, even if someone else offered to pay. I'd probably give in to purchasing a designer bag if it was seriously discounted and as long as it's not fake (but hugely discounted bags will most likely be fake). I might just buy one when I go to France/UK... maybe.

I have learned my lesson though. I will no longer buy second-hand, synthetic leather, the bags on eBay, the bags in night markets and tiangge. Why?
  1. Speaking from experience, they've fallen apart too quickly. The synthetic leather peeled after a month of use. I carry a lot of things in my bag so the handles got ripped and the inside pockets got ripped too. There was one other bag where I took it out for the first time, and the buckle fell off and got lost. Now, the bag won't close.
  2. I'm not that familiar with designer bags, so I ended up buying a knock-off that I didn't know was a knock-off. Feeling proud of myself, I sent a photo to my sister. She replied "That's a fake Balenciaga". Hassle!
  3. I know most of the manufacturers of these bags are not located in the Philippines and they're probably made in factories that pay their workers peanuts. I read a lot of articles about how fake goods help fund terrorist activities - but I'm not sure if this is just some B.S. spun by the likes of luxury companies to discourage people from buying knock-offs.

When I look for a bag, it should be practical and classy. It should be in a neutral color, that would go with all my outfits. It should be something I can use for everyday (work/casual). It should be durable, because I don't want to pay for something that will fall apart after a month of daily use. It shouldn't be heavy because I lug around so many things, or else I'll have back pain. I like backpacks because the weight is evenly distributed across both sides, but most backpacks makes me look like I'm going to school. I don't like bags with short-handles because I can only carry them up to my forearm. I know, dami kong kaartehan.

I said before I want to avoid buying real leather for animal right's purposes, but since I love eating steak, it would seem hypocritical of me to avoid cow leather. The synthetic leather bags/shoes peeled after a while. I'm hoping this won't happen to real leather.

So lo' and behold! After months of searching and obsessing, my friend recommended Ni QUA (www.ni-qua.com). It's a Filipino-brand of leather goods and their style, they say, is called "Easy Chic". They have a section on Bespoke bags where you can choose the colors. It's not cheap, yet not overpriced either. Check the prices on their website.

Last Monday, I sent in my order. I had a hard time choosing between their Miggoy and their Cartelle. I needed the practicality of the Miggoy Document Satchel (for work) but the style of the Cartelle, so I asked to add the Cartelle twist lock into the Miggoy (not only for the style, but also for added security). I made an illustration of how I wanted it to look like. Thankfully, they allowed it! I paid for my bag the following day.


Fast forward... it arrives!


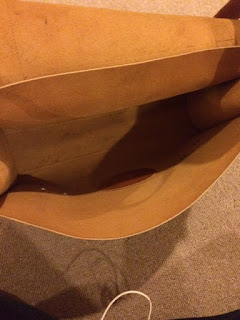
I loved it!!! :) :) :) The leather is thick but since there's no lining, it wasn't heavy. There's no waxing at the edges. The shape stays upright so the things inside my bag don't easily tumble around.


At first, the 2 straps at the sides were difficult to put in when it was empty, but then it got easier to put in when there were already things inside. Plus, a few times of practice made the leather a bit softer, which made it cooperate better.


Then I carry it around though, my hands keep trying to grab a handle that doesn't exist. I do that when I feel that the shoulder straps are about to slide off. Maybe I should have asked for a handle.

I accidentally scratched it when I was trying to close the bag, but it's no biggie, because I'm also looking forward to how it will be when it transforms into the "weathered/distressed" leather-look.

Overall, I'm happy with it. Although I don't know yet how long this will last, because it's only been used for a day. I'll come back to this post and make an update maybe after 2 to 3 months of use.

Thursday, February 26, 2015

Postcards App by Posten.se

I've been wanting to send a card or a letter to my friend in Sweden. I haven't seen her in almost a year, so I wanted to send a little something: a postcard or a greeting card. I absolutely hate "losing friends" because of distance/timezone issues, and I'm not going to lose this friend just because she lives in another continent!

Unfortunately, there's not much info online in how to send mail abroad (from Manila, Philippines) and I don't know how much it will cost. I also don't know where I can send snail-mails anymore. :-/

I stumbled into Postcards by Posten.se, a website/app that will electronically create a postcard, using any photo from your camera roll (iphone) or in facebook. At the back, I entered the message and the mailing address. I ended up with a bill of $2.99/postcard which isn't too bad. That's about Php 130.

The postcard arrived the following day, as they promised. Since the company is within Sweden and the order was made before 4PM Central Europe Time, the postcard arrived the next workday.

Here's the steps:
  1. Download and open the Postcard app. The app itself is free to download.
  2. Click on Get Image or New Photo to choose which picture to use
  3. Flip it at the back to enter the message and the mailing address
  4. Once done, click on Send, then Pay and Submit
  5. Enter your payment information, click on Pay
  6. Once paid, an email notification will arrive. So simple!
I just blurred out the photo and message. ;)

There are other apps out there, they may be cheaper (around $1.49) or with better functionalities. I just didn't choose them because they might be based in an entirely different continent from my friend's location (which means it will take a longer time to arrive).

Check out some of the links below.

I haven't seen the actual postcard, so I can't comment on the quality.

Wednesday, January 21, 2015

Polagram PH: Turn Instagram Photos into Magnets in Manila!

I decided to try out Polagram.ph after someone commented on my Canvas Prints in Manila post form 2 years ago. One of my favorite things to do is to take photos and post on Instagram. I ordered 20 2x2 magnets for Php 778 (minimum starts at Php350 with 9 magnets). It comes with free shipping!

I ordered some family photos to be posted on our fridge, that way, people at home get good vibes whenever they go to the kitchen.

I wasn't able to get screenshots of all the steps, but it's quite straightforward: 1) Log in with your Instagram account. 2) Choose the photos you want to print. 3) Put in the shipping details. 4) Pay with Paypal or Over the Counter.

The main tough part for me was when I need to remove some items, I had to re-choose everything all over again, so make sure you choose carefully before hitting Submit Order. Plus, my internet was wonky when I clicked pay with Paypal so I ended up submitting twice, generating 2 order numbers. The folks at Polagram quickly addressed it, so no problem.

After choosing, this is the next page with the order summary


Put in the shipping details after the order summary.


I'll be updating this along with the results of the actual magnets! I can't wait!!! I got a text from PolagramPH saying my magnets will arrive on Friday (48 hours after my order), such good customer service! :) I'll append this post with an update on the actual magnets.


Update: I got the magnets this morning, as theyve committed! It's set on a card. I love them! :) They're now stuck on our fridge.

Zoodles Marinara


My brother & I made zucchini noodle pasta with our new julienne peeler I got from Cooks Exchange! My brother made the spinach marinara sauce while i made the "zoodles" (zucchini noodles). He will probably be the one to post the step by step stuff, but as for me, I'm content with just posting the gist of it.

It was almost vegan... until we added the parmesan cheese and we used leftover wagyu beef fat from yesterday's dinner instead of olive oil. It's not entirely good-for-you, but using zucchini noodles is a great way of cutting down the carbs from regular pasta noodles.

Main lesson learned that I want to share: saute the zoodles first separately to get rid of the excess liquid before combining with the sauce because we ended up having a very soupy dish. It was still good, but it watered down the sauce.

Also, for the core of the zucchini which I don't end up turning into zoodles, I chopped and blended them along with cucumber, orange, mangoes, spinach stems, ginger, and peppermint for a refreshing shake!