Wednesday, August 31, 2016

Unicity Bios Life Product Experience

The other day, my sister gave me Unicity Clear Start kit. I'm skeptical, but what the heck -- it was a gift. If it helps with cleansing and weight loss, and it's not entirely unpleasant, why not give it a go?

I've seen plenty of online reviews prior to starting. Most of them did not seem very objective. It looked like they were mostly written by people selling the product. Because I found it frustrating that plenty of the reviews weren't objective, I wanted to share my experience online. I hope you (the reader) will find this helpful!

WARNING: Possibly TMI. Read at your own risk.


Contents:
  • Paraway Capsule - right after waking up
  • LiFiber Powder - before eating the first meal of the day
  • Tea - after dinner
In terms of physical activity, I'm not active and I don't walk around much. I didn't do anything different throughout the cycle. As for diet, I've been eating more salads for lunch but the dinner is just the same.


Saturday, August 1, 2015

My New Bespoke NiQUA Satchel


I don't know how or why, but one of my favorite things to do is hunting for nice bags to buy. I have my "episodes" about 3-4 times a year. It would take months before I would settle for the one (at least, for now).

I would never buy the branded ones for myself, even if someone else offered to pay. I'd probably give in to purchasing a designer bag if it was seriously discounted and as long as it's not fake (but hugely discounted bags will most likely be fake). I might just buy one when I go to France/UK... maybe.

I have learned my lesson though. I will no longer buy second-hand, synthetic leather, the bags on eBay, the bags in night markets and tiangge. Why?
  1. Speaking from experience, they've fallen apart too quickly. The synthetic leather peeled after a month of use. I carry a lot of things in my bag so the handles got ripped and the inside pockets got ripped too. There was one other bag where I took it out for the first time, and the buckle fell off and got lost. Now, the bag won't close.
  2. I'm not that familiar with designer bags, so I ended up buying a knock-off that I didn't know was a knock-off. Feeling proud of myself, I sent a photo to my sister. She replied "That's a fake Balenciaga". Hassle!
  3. I know most of the manufacturers of these bags are not located in the Philippines and they're probably made in factories that pay their workers peanuts. I read a lot of articles about how fake goods help fund terrorist activities - but I'm not sure if this is just some B.S. spun by the likes of luxury companies to discourage people from buying knock-offs.

When I look for a bag, it should be practical and classy. It should be in a neutral color, that would go with all my outfits. It should be something I can use for everyday (work/casual). It should be durable, because I don't want to pay for something that will fall apart after a month of daily use. It shouldn't be heavy because I lug around so many things, or else I'll have back pain. I like backpacks because the weight is evenly distributed across both sides, but most backpacks makes me look like I'm going to school. I don't like bags with short-handles because I can only carry them up to my forearm. I know, dami kong kaartehan.

I said before I want to avoid buying real leather for animal right's purposes, but since I love eating steak, it would seem hypocritical of me to avoid cow leather. The synthetic leather bags/shoes peeled after a while. I'm hoping this won't happen to real leather.

So lo' and behold! After months of searching and obsessing, my friend recommended Ni QUA (www.ni-qua.com). It's a Filipino-brand of leather goods and their style, they say, is called "Easy Chic". They have a section on Bespoke bags where you can choose the colors. It's not cheap, yet not overpriced either. Check the prices on their website.

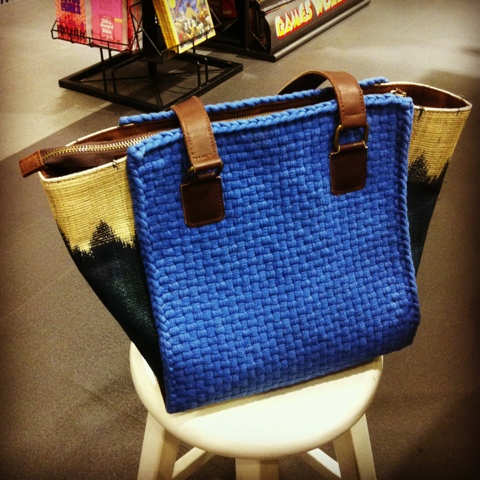
Last Monday, I sent in my order. I had a hard time choosing between their Miggoy and their Cartelle. I needed the practicality of the Miggoy Document Satchel (for work) but the style of the Cartelle, so I asked to add the Cartelle twist lock into the Miggoy (not only for the style, but also for added security). I made an illustration of how I wanted it to look like. Thankfully, they allowed it! I paid for my bag the following day.


Fast forward... it arrives!


I loved it!!! :) :) :) The leather is thick but since there's no lining, it wasn't heavy. There's no waxing at the edges. The shape stays upright so the things inside my bag don't easily tumble around.


At first, the 2 straps at the sides were difficult to put in when it was empty, but then it got easier to put in when there were already things inside. Plus, a few times of practice made the leather a bit softer, which made it cooperate better.


Then I carry it around though, my hands keep trying to grab a handle that doesn't exist. I do that when I feel that the shoulder straps are about to slide off. Maybe I should have asked for a handle.

I accidentally scratched it when I was trying to close the bag, but it's no biggie, because I'm also looking forward to how it will be when it transforms into the "weathered/distressed" leather-look.

Overall, I'm happy with it. Although I don't know yet how long this will last, because it's only been used for a day. I'll come back to this post and make an update maybe after 2 to 3 months of use.

Thursday, February 26, 2015

Postcards App by Posten.se

I've been wanting to send a card or a letter to my friend in Sweden. I haven't seen her in almost a year, so I wanted to send a little something: a postcard or a greeting card. I absolutely hate "losing friends" because of distance/timezone issues, and I'm not going to lose this friend just because she lives in another continent!

Unfortunately, there's not much info online in how to send mail abroad (from Manila, Philippines) and I don't know how much it will cost. I also don't know where I can send snail-mails anymore. :-/

I stumbled into Postcards by Posten.se, a website/app that will electronically create a postcard, using any photo from your camera roll (iphone) or in facebook. At the back, I entered the message and the mailing address. I ended up with a bill of $2.99/postcard which isn't too bad. That's about Php 130.

The postcard arrived the following day, as they promised. Since the company is within Sweden and the order was made before 4PM Central Europe Time, the postcard arrived the next workday.

Here's the steps:
  1. Download and open the Postcard app. The app itself is free to download.
  2. Click on Get Image or New Photo to choose which picture to use
  3. Flip it at the back to enter the message and the mailing address
  4. Once done, click on Send, then Pay and Submit
  5. Enter your payment information, click on Pay
  6. Once paid, an email notification will arrive. So simple!
I just blurred out the photo and message. ;)

There are other apps out there, they may be cheaper (around $1.49) or with better functionalities. I just didn't choose them because they might be based in an entirely different continent from my friend's location (which means it will take a longer time to arrive).

Check out some of the links below.

I haven't seen the actual postcard, so I can't comment on the quality.

Wednesday, January 21, 2015

Polagram PH: Turn Instagram Photos into Magnets in Manila!

I decided to try out Polagram.ph after someone commented on my Canvas Prints in Manila post form 2 years ago. One of my favorite things to do is to take photos and post on Instagram. I ordered 20 2x2 magnets for Php 778 (minimum starts at Php350 with 9 magnets). It comes with free shipping!

I ordered some family photos to be posted on our fridge, that way, people at home get good vibes whenever they go to the kitchen.

I wasn't able to get screenshots of all the steps, but it's quite straightforward: 1) Log in with your Instagram account. 2) Choose the photos you want to print. 3) Put in the shipping details. 4) Pay with Paypal or Over the Counter.

The main tough part for me was when I need to remove some items, I had to re-choose everything all over again, so make sure you choose carefully before hitting Submit Order. Plus, my internet was wonky when I clicked pay with Paypal so I ended up submitting twice, generating 2 order numbers. The folks at Polagram quickly addressed it, so no problem.

After choosing, this is the next page with the order summary


Put in the shipping details after the order summary.


I'll be updating this along with the results of the actual magnets! I can't wait!!! I got a text from PolagramPH saying my magnets will arrive on Friday (48 hours after my order), such good customer service! :) I'll append this post with an update on the actual magnets.


Update: I got the magnets this morning, as theyve committed! It's set on a card. I love them! :) They're now stuck on our fridge.

Zoodles Marinara


My brother & I made zucchini noodle pasta with our new julienne peeler I got from Cooks Exchange! My brother made the spinach marinara sauce while i made the "zoodles" (zucchini noodles). He will probably be the one to post the step by step stuff, but as for me, I'm content with just posting the gist of it.

It was almost vegan... until we added the parmesan cheese and we used leftover wagyu beef fat from yesterday's dinner instead of olive oil. It's not entirely good-for-you, but using zucchini noodles is a great way of cutting down the carbs from regular pasta noodles.

Main lesson learned that I want to share: saute the zoodles first separately to get rid of the excess liquid before combining with the sauce because we ended up having a very soupy dish. It was still good, but it watered down the sauce.

Also, for the core of the zucchini which I don't end up turning into zoodles, I chopped and blended them along with cucumber, orange, mangoes, spinach stems, ginger, and peppermint for a refreshing shake!

Monday, August 4, 2014

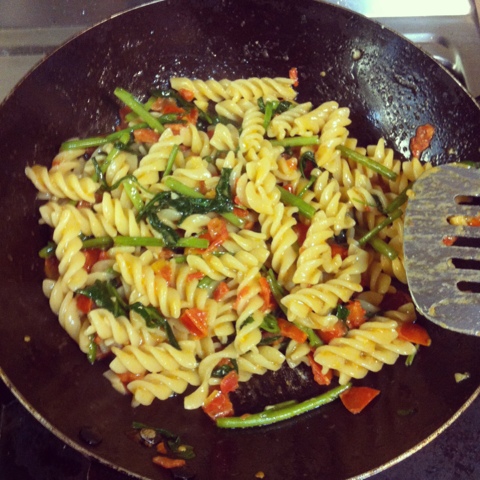
Tomato-Spinach with Brie Cheese Pasta

When some of my Italian friends have left the country, they left behind some things in our fridge that they couldnt take with them. One of these things were 1) this big wheel of President Brie Cheese that I didn't want to see go to waste 2) Leftover fusilli good for 1 hungry person.

I searched for recipes online on what I could do, and I found this video on youtube where the sauce ingredients were only olive oil, fresh diced tomatoes, garlic oregano, and brie cheese.

I didn't have oregano or any kind of herbs, so I ended up putting spinach instead (for greens). A friend suggested I should have put tuna so it has some protein in it... which I did later on for a salad with brie cheese (the salad didnt turn out very well).

Ingredients (good for 1 hungry person)
- 2 tbsp olive oil
- 1 clove of garlic chopped but not too small
- 1/2 cup of diced tomatoes (or more)
- 2 handfuls of fresh spinach
- a big tablespoon chunk of brie cheese
- cooked leftover pasta good enough for one!

Steps:
1) Saute the tomatoes and garlic first in olive oil
2) Dump in the cheese and wait for it to go all melty
3) Put in the spinach (although in hindsight, I should have put the spinach first so they'd wilt further before I burn the cheese).
4) Put in the cooked pasta!


5) Then just eat off the pan. Saves time cleaning dishes. Yum.

Vegetarian... and then Not-Vegetarian Chilli


I had an American friend who told me she was going to cook Vegetarian Chilli for me. However, I didn't get a chance to try it because of time constraints. :-/ I was craving for it the other day and then my boyfriend's birthday potluck was coming up and asked me to bring veggies (because everyone was bringing meat) so I ended up making it!

This blog entry starts off with making the vegetarian version... and then later on mixing it with leftovers so it wasn't vegetarian anymore. According to one of my food-critic friends, he thought it tasted delicious, but his mind was still searching for that "bite of meat".

How I made the Chilli, the summarized version :)

Vegetarian Version

The ingredients! Lots of beans, tomatoes, corn, herbs... don't mind the photo-bombing banana.
Ingredients:
  • 2 cans of mixed bean
  • 1 can of red kiney beans
  • 1 can of whole kernel corns
  • 2 cans of whole peeled tomatoes, blended but still keep some chunks
  • 1 can of chicken broth
  • 1 medium red onion, chopped
  • 3 cloves of garlic, chopped
  • 1 green bell pepper, diced
  • 1 tbsp olive oil
  • 1 tsp ground cumin
  • 1 tsp ground chilli powder
  • salt and pepper
  • a spring of rosemary -- just because I had it. be careful not to add too much!
  • a little bit of maple syrup - why? because I wanted it a bit sweeter

Steps:

1.) Drain and rinse the beans and corn. We need to get rid of the icky chemical-tasting liquid. Chop the garlic, onions, and bell pepper.

Drained and rinsed the beans and corn, chopped the onions, garlic, and bell pepper

2. Saute first the onions and the bell peppers in olive oil until soft. Then add the garlic and saute until golden brown.

Sautee the bell peppers, onions, and garlic

3. Pour over everything else, and let it simmer for about 30 minutes. The liquid will have reduced by then and the flavors would seep into the beans and corn.

Everything's in the pot, then boil
4. This is what it looks like reduced after simmering for half an hour.

Boiling for quite some time already
5. Serve it into a bowl. :D Eat with rice or with bread.

Served in a bowl
With Leftover Meat Version

As for the non-vegetarian version... I had some kesong puti (white cheese) from Mr. Moo in Tagaytay and we had some leftover Deli Mondo Spicy corned beef (favorite!!!). I combined everything together and nuked it in the microwave.

Leftover Chilli, Kesong Puti, and Corned Beef

The cheese got all melty and I swirled it a little bit around. I had this marbly thing going. :) I'm no vegetarian, so I definitely liked this one better!


The Instagrammed Version

Sunday, August 3, 2014

Fishing for Shrimps in Shilin Taipei 釣蝦場

Last week when I was in Taipei, I was brought to this shrimp-fishing place in Shilin (釣蝦場). You fish for shrimps and you cook them later on. We had to go by car because there's no MRT nearby.

The rent for 1 fishing rod for 1 hour was 350 NTD, while for 2 hours it was 600 NTD. We used the fishing rods to fish for shrimps in this murky pool. As for the bait, my friend bought it for us.

釣蝦場 - Shrimp Fishing Place
There's a certain "art" to catching a shrimp. You have to move the bait slowly around, as if it was moving like a fish. I had to be reminded several times - "that's not how a fish moves!". The bait movement needs to be slow and steady. According to my friend, the shrimp will first test the bait for danger by using its claws (I only found out this day that shrimps actually had claws!). After testing, it will start to nibble the bait and pull at the hook. When it does, I jerked the fishing rod and the shrimp gets hooked! (Ouch). Then I pull out the fishing rod.


My friends, posing with the shrimp they caught

After catching the shrimp, my friend had to pull out its claws (double-ouch! :( poor things). If he didn't pull it out, it would be hard for him to remove the hook from the mouth. I didn't take photos, but there's a bunch of shrimp claws/arms all over the floor. I only tried pulling out the shrimp's claw/arm once.

This is me, posing with the shrimp I caught
For the 2 hours that we've been fishing, I managed to catch 8. Not bad for a first-timer. At the earlier parts, a lot of them managed to get away, along with the bait from the hook (waited for too long before jerking or pulling too slow).

I cleaned those 8 myself. By cleaning, I mean pulling out its legs and the long thing from its snout. I felt really bad doing it... it must be torture for them.

Ready for skewering

After the shrimps have been cleaned, the next step is to skewer them with the BBQ sticks from the tail up to the head. While I'm excited to eat grilled shrimps, I just feel really bad for them. After skewering them all, we lined them up and poured salt to coat them.

Grilling shrimps

After this, we grilled them! I think we overcooked some, but majority of the shrimps were grilled correctly. Of course, the shrimps were fresh. We bought drinks, rice, and other food after this. For the shrimp sauce, they gave us soy sauce and wasabi. For me, I had my shrimps with Heineken.

Cooked Shrimps!

Overall, I had fun! Mixed feelings of excitement over the fishing activity but guilt for torturing shrimps (according to scientific studies, shrimps do feel pain). If I were to do this again, I would probably just behead them from the start and then bring over some pesto, chopped garlic, and lemon for marinade prior to grilling. Yum.

Quick recap of the whole thing!

Saturday, May 24, 2014

Creme dela Creme Blog

My brother and sister-in-law are starting a new blog together. It's called Creme dela Creme. http://itsacremedelacremelife.com/

Check it out! They only have 1 entry so far on their Brazilian Stew (Feijoada). The upcoming one is a cheesecake. :)

Here's a photo of their Feijoada. I've tried it and it's really yummy.

Photo of Feijoada that I took using iPhone 5s

Saturday, November 16, 2013

Hot Sweet Ginger Tea with Chia Seeds

I've been consuming chia seeds on a daily basis since my friend gave it to me as a gift. The other day, I passed by a stall that gave out ginger tea with chia seeds as a sample. It turned out pretty awesome! Because of that, I decided to make some for myself.

Ingredients
- a knob of ginger
- 1 tbsp of chia seeds
- 1 tsp brown sugar or honey (optional)
- 1 1/2 cups of water

Steps:
1. Boil the ginger, sugar/honey, and water to make the ginger tea.
2. Soak the chia seeds in half cup of water for about 5 minutes.
3. When it's ready, serve it in mugs and mix with chia seeds. Serve hot! :)


Thursday, October 24, 2013

Quick Apple Crumble!

I got inspired to try this after seeing it on a site that I now can't find. :( I dont remember my search keywords and I dont remember what it looked like. So now I'm posting it to keep it in memory.

This is a microwave recipe. I know there are anti-microwave people out there, i know you can use a normal oven with this, but I just don't have one with me now.

So here goes!

Ingredients:
- An apple
- 4 tbsp instant oatmeal (plain)
- 1 tbsp brown sugar
- a dash of cinnamon if you have it!
- 2 tbsp butter chunks
- dollop of plain yogurt or vanilla ice cream

Steps:
1. Chop the apples into .5 cm thickness
2. Place it around the bowl
3. Mix the oatmeal and sugar. Put on top of the apples. Sprinkle cinnamon if you have it.
4. Spread the butter chunks/dots around the top.
5. Microwave for a minute or 1 1/2 minutes. (Or put in an oven but I dont know yet for how long).
6. Put the yogurt or ice cream and dig in!

Tuesday, September 24, 2013

Poached Eggs on Top of Bacon-fat Toasted Bread

Kind of difficult to write an entry now on my phone... but i wanted to post my food pics here of the poached eggs, ham, salsa, amaranth, and bacon-fat toasted bread (unhealthy, I know).

As for the salsa I made, I made a jar-ful of it and ill be eating it throughout the week. I'm trying out some efficiency strategies these week to cut down on time required. :)


Monday, September 2, 2013

Beef Salpicao-style Marinated in Red Wine


Today, I cooked raw meat all by myself. I've always been used to veggies/fruits/canned stuff so preparing something out of raw meat is something new for me. I saw the chunk of raw tenderloin in the Supermarket today which costed roughly PhP 90, so I decided to try it out for today. 

All day, I was concerned if I was working with spoiled meat. Throughout the prep-work, I was checking online on how to know if the meat is spoiled. So far, it all boiled down to the smell. Mine didnt smell funky. The color was good too! The parts that were frozen had a deeper color but I knew it was of a different color because certain parts got frozen.

With the limited stuff available in the apartment kitchen, I just ended up grabbing again whatever was available. I used a Red Wine marinade recipe as a guide, though I didnt have everything.

So anyway, it turned out really well, so that's why I'm posting it here today!

Ingredients:
  • 8 oz tenderloin
  • 2 cloves of garlic, minced
  • 1 tbsp olive oil
  • 1/3 cup dry red wine
  • sprinkle salt and pepper
  • 1 tbsp rice vinegar
  • 1 tbsp Yakiniku sauce (i didnt have the Worcestershire sauce, so I ended up with this)
  • 1/2 tsp sugar


Procedure:
  1. Cut the beef into 1 inch by 1/2 inch (salpicao style).
  2. Mix everything together. Make sure to taste and adjust . Don't make it too salty.
  3. Marinate it for at least 2 hours, maximum 6 hours.
  4. When it's ready, put some olive oil in the pan at high heat. Put in the beef chunks one at a time. Flip it over once. It should get that crusty seared texture on the outside.
  5. For the sauce, pour the marinade into the pan to cook for about a minute. When it's done, pour over the beef.

Wednesday, July 31, 2013

Pizza Hut Party at the Office, Thanks to BPI Credit Card Charge Slips

I had some credit card charge slips from BPI over the past 2 months and I saw in the Real Thrills website that the promo with Pizzahut/DQ/Taco Bell would be over in July 31.

My officemates went with me to the nearest Pizza Hut branch to get our freebies. :) (Take-out only) The maximum charge slips we could use was 3. We used 2 charge slips above 12k and 1 above 6k.

We ended up with:

  • 1 family size bacon cheeseburger
  • 1 regular size supreme
  • 1 family size spaghetti with meatballs


I added in an additional order of their chicken wings (I love the Medium Buffalo!)


We brought it back to the office and we had a mini merienda party!

If you've got BPI charge slips (at least 2k) from May 15 , 2013 to July 31, 2013 from BPI, avail it soon! You can only do so until Sept 29, 2013.

I still have a couple left. I'd like to go to Taco Bell for my next set. It's been a long time since I had a Taco.

Update: For charge slips dated August 1, 2013 to October 24, 2013, they have freebies in Chowking!


Wednesday, June 12, 2013

Painting Ceramics at Color Me Mine Hobbes & Landes

As early as I could, I influenced my niece to like artsy craftsy stuff. When she was around 3, I started bringing her to the Color Me Mine section of Hobbes and Landes.

Our most recent trip was to paint an angel. She's now into the more-complicated stuff. We started before with small and simple fishes or butterflies. The plaster figurines range from 300-1000 Php, depending on the size and complexity. There's also a painting and baking fee which is about 180 Php, if I remember correctly.

Here's photos of our most recent Angel figurine!

We first choose the figurine we want to paint


They lent us their tools and they gave us paint. We get to choose 5 at a time. My niece really wanted purple & pink.

Here's what it looks like after we finish painting! But we can't take it home yet...

We left it with Hobbes & Landes for glazing. General waiting time is 3 weeks.
When it comes back, it's all shiny and the colors are more vibrant.. :)

Here's what their station looks like. Lots of figurines and paint to choose from!


Here's some of the old stuff she did. We've done a lot more, but these were the only ones which I still had in my phone.

Here's a fairy

Freaky fish?


You can visit their international site at http://www.colormemine.com

Kaleidoscope-Kit from the Art Garden

Isn't it pretty? It's what it looks like through the kaleidoscope I made from the Kaleidoscope-Kit I got from the Children's Art Museum I visited in Singapore (Art Garden).


They gave us a kit (see below). It contains 3 pieces of something-like-glass (something not easily breakable). In each piece, there was a double-sided tape stuck to it. There was also a piece of paper where I stuck each glass-piece. After folding everything together as if it were a triangular tube, I now have my kaleidoscope! I guess I still need to color the exterior... it still looks so plain!


I got 2 kits, because the friend I went with wasn't interested in making one for herself. Now, I'm saving it for when my niece comes around in the weekend.

Here's a bigger photo of the view from the kaleidoscope. :)


To know more about the Art Garden in the Singapore Art Museum, visit here - http://www.singaporeartmuseum.sg/exhibitions/details.php?id=114

Tuesday, April 9, 2013

Idea! Rib Eye Steak with Bacon Bits

Last Sunday was my mom's birthday.

The whole family went out for dinner buffet in Paseo Uno (thanks to Dealgrocer for the discount).

One of the dishes I kept coming back for was the Rib Eye steak station. I had 3 slices! (I also love their fish masala, but that's not what I'll be sharing here).

I love love steak. And I love love love bacon! So at the steak station, they had the baked potatoes station nearby. I thought to myself: If the toasted fat of the steak tastes like bacon, why not add it in?

So I proceeded to topping my steak with bacons bits! Here's a picture...

YUM! #thisiswhyimfat


It's a more sinful and fattier version of the fillet mignon! :P


Newel Kena Rags2Riches Bag

Throughout the month of March, I've been itching to buy a new bag. After searching online all over, I ended up obsessing for 3 days of the Holy Week holiday over the bags from Rags2Riches (http://www.rags2riches.ph).

[It's been a month since I made my last entry. I haven't done much except work and watch tv series... and go out and eat with friends... not much time to write before.

I've asked my friends and family for their opinions... I've gone through online shopping sites Zalora, Ava, and the R2R site itself! I ended up buying from the Aranaz store in Powerplant Mall because I didn't want to pay for the shipping fees and I wanted the blue one.

So here it is! Isn't it pretty?

I use it now as my main bag for work and weekends. It goes well with jeans!

At the first day, I thought it was kind of heavy. The blue weave fabric is quite thick. After that, it's not so heavy anymore.

For the t'nalak weaves at the sides, it will tend to fray so be careful with it.


The bags are made by artisans from not so well-off communities in the Philippines and they get paid fairly for it (not get exploited by middle-men). Normally, they would be forced to work for 70php a week (that's already a meal for the average Makati person). With Rags2Riches, they have the opportunity to get 1000php a week.

The materials they use are also upcycled. The fabric used in making the weaves are scraps.

Read more about their story here.

Moving forward, I'll be more conscious about the things I buy... if there is an eco-ethical and fair trade alternative, I'll veer towards that instead, though not necessarily cheaper. Normally, I would go for low-cost... but you never really know if it's cheap because someone got poorly-paid for it along the way.

Friday, February 1, 2013

Mushroom & Artichoke Cheese Bruschetta

Using the leftover stuff I had from last week's kitchen adventures, i merged them together with small toasted bread.


For the Artichoke Cheese Dip, click here

For the mushroom, I basically did the steps in the mushroom soup prep up until the soup stock gets poured in. The only thing I forgot was the salt which should have been at the beginning when i first added the mushrooms. Plus I added some truffle oil (3 drops), chilli flakes, and a bit of soy sauce.


Ingredients:

  • 2 packs of white button mushrooms (230g each)
  • 1 clove of garlic, whole, uncrushed
  • 1 small purple onions, chopped
  • 2 tbsp butter
  • a dash of dried thyme
  • 3 drops of truffle oil at the end
  • salt and pepper
  • a dash of tabasco or a dash of chilli flakes
  • Small pieces of bread (around 2 inches wide)
  • 1 oz of Artichoke Dip
  • 5 small pieces of bread


How to:

  1. Put the butter, mushrooms, a big pinch of salt in a soup pot at med-high heat
  2. Keep stirring, the juices will eventually come out.
  3. Wait for the juice to evaporate mostly and the mushrooms are now brown.
  4. Turn down to med-low heat. Added the onions and saute until clear.
  5. Add the herbs, clove of garlic, and the chicken stock and water.
  6. Toast the bread, add a dollop of the artichoke cheese, top with the sauteed mushrooms.