Showing posts with label Cooking. Show all posts

Wednesday, January 21, 2015

Zoodles Marinara


My brother & I made zucchini noodle pasta with our new julienne peeler I got from Cooks Exchange! My brother made the spinach marinara sauce while i made the "zoodles" (zucchini noodles). He will probably be the one to post the step by step stuff, but as for me, I'm content with just posting the gist of it.

It was almost vegan... until we added the parmesan cheese and we used leftover wagyu beef fat from yesterday's dinner instead of olive oil. It's not entirely good-for-you, but using zucchini noodles is a great way of cutting down the carbs from regular pasta noodles.

Main lesson learned that I want to share: saute the zoodles first separately to get rid of the excess liquid before combining with the sauce because we ended up having a very soupy dish. It was still good, but it watered down the sauce.

Also, for the core of the zucchini which I don't end up turning into zoodles, I chopped and blended them along with cucumber, orange, mangoes, spinach stems, ginger, and peppermint for a refreshing shake!

Monday, August 4, 2014

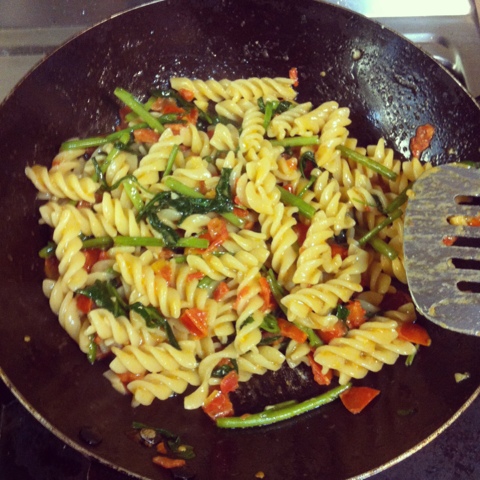
Tomato-Spinach with Brie Cheese Pasta

When some of my Italian friends have left the country, they left behind some things in our fridge that they couldnt take with them. One of these things were 1) this big wheel of President Brie Cheese that I didn't want to see go to waste 2) Leftover fusilli good for 1 hungry person.

I searched for recipes online on what I could do, and I found this video on youtube where the sauce ingredients were only olive oil, fresh diced tomatoes, garlic oregano, and brie cheese.

I didn't have oregano or any kind of herbs, so I ended up putting spinach instead (for greens). A friend suggested I should have put tuna so it has some protein in it... which I did later on for a salad with brie cheese (the salad didnt turn out very well).

Ingredients (good for 1 hungry person)
- 2 tbsp olive oil
- 1 clove of garlic chopped but not too small
- 1/2 cup of diced tomatoes (or more)
- 2 handfuls of fresh spinach
- a big tablespoon chunk of brie cheese
- cooked leftover pasta good enough for one!

Steps:
1) Saute the tomatoes and garlic first in olive oil
2) Dump in the cheese and wait for it to go all melty
3) Put in the spinach (although in hindsight, I should have put the spinach first so they'd wilt further before I burn the cheese).
4) Put in the cooked pasta!


5) Then just eat off the pan. Saves time cleaning dishes. Yum.

Vegetarian... and then Not-Vegetarian Chilli


I had an American friend who told me she was going to cook Vegetarian Chilli for me. However, I didn't get a chance to try it because of time constraints. :-/ I was craving for it the other day and then my boyfriend's birthday potluck was coming up and asked me to bring veggies (because everyone was bringing meat) so I ended up making it!

This blog entry starts off with making the vegetarian version... and then later on mixing it with leftovers so it wasn't vegetarian anymore. According to one of my food-critic friends, he thought it tasted delicious, but his mind was still searching for that "bite of meat".

How I made the Chilli, the summarized version :)

Vegetarian Version

The ingredients! Lots of beans, tomatoes, corn, herbs... don't mind the photo-bombing banana.
Ingredients:
  • 2 cans of mixed bean
  • 1 can of red kiney beans
  • 1 can of whole kernel corns
  • 2 cans of whole peeled tomatoes, blended but still keep some chunks
  • 1 can of chicken broth
  • 1 medium red onion, chopped
  • 3 cloves of garlic, chopped
  • 1 green bell pepper, diced
  • 1 tbsp olive oil
  • 1 tsp ground cumin
  • 1 tsp ground chilli powder
  • salt and pepper
  • a spring of rosemary -- just because I had it. be careful not to add too much!
  • a little bit of maple syrup - why? because I wanted it a bit sweeter

Steps:

1.) Drain and rinse the beans and corn. We need to get rid of the icky chemical-tasting liquid. Chop the garlic, onions, and bell pepper.

Drained and rinsed the beans and corn, chopped the onions, garlic, and bell pepper

2. Saute first the onions and the bell peppers in olive oil until soft. Then add the garlic and saute until golden brown.

Sautee the bell peppers, onions, and garlic

3. Pour over everything else, and let it simmer for about 30 minutes. The liquid will have reduced by then and the flavors would seep into the beans and corn.

Everything's in the pot, then boil
4. This is what it looks like reduced after simmering for half an hour.

Boiling for quite some time already
5. Serve it into a bowl. :D Eat with rice or with bread.

Served in a bowl
With Leftover Meat Version

As for the non-vegetarian version... I had some kesong puti (white cheese) from Mr. Moo in Tagaytay and we had some leftover Deli Mondo Spicy corned beef (favorite!!!). I combined everything together and nuked it in the microwave.

Leftover Chilli, Kesong Puti, and Corned Beef

The cheese got all melty and I swirled it a little bit around. I had this marbly thing going. :) I'm no vegetarian, so I definitely liked this one better!


The Instagrammed Version

Sunday, August 3, 2014

Fishing for Shrimps in Shilin Taipei 釣蝦場

Last week when I was in Taipei, I was brought to this shrimp-fishing place in Shilin (釣蝦場). You fish for shrimps and you cook them later on. We had to go by car because there's no MRT nearby.

The rent for 1 fishing rod for 1 hour was 350 NTD, while for 2 hours it was 600 NTD. We used the fishing rods to fish for shrimps in this murky pool. As for the bait, my friend bought it for us.

釣蝦場 - Shrimp Fishing Place
There's a certain "art" to catching a shrimp. You have to move the bait slowly around, as if it was moving like a fish. I had to be reminded several times - "that's not how a fish moves!". The bait movement needs to be slow and steady. According to my friend, the shrimp will first test the bait for danger by using its claws (I only found out this day that shrimps actually had claws!). After testing, it will start to nibble the bait and pull at the hook. When it does, I jerked the fishing rod and the shrimp gets hooked! (Ouch). Then I pull out the fishing rod.


My friends, posing with the shrimp they caught

After catching the shrimp, my friend had to pull out its claws (double-ouch! :( poor things). If he didn't pull it out, it would be hard for him to remove the hook from the mouth. I didn't take photos, but there's a bunch of shrimp claws/arms all over the floor. I only tried pulling out the shrimp's claw/arm once.

This is me, posing with the shrimp I caught
For the 2 hours that we've been fishing, I managed to catch 8. Not bad for a first-timer. At the earlier parts, a lot of them managed to get away, along with the bait from the hook (waited for too long before jerking or pulling too slow).

I cleaned those 8 myself. By cleaning, I mean pulling out its legs and the long thing from its snout. I felt really bad doing it... it must be torture for them.

Ready for skewering

After the shrimps have been cleaned, the next step is to skewer them with the BBQ sticks from the tail up to the head. While I'm excited to eat grilled shrimps, I just feel really bad for them. After skewering them all, we lined them up and poured salt to coat them.

Grilling shrimps

After this, we grilled them! I think we overcooked some, but majority of the shrimps were grilled correctly. Of course, the shrimps were fresh. We bought drinks, rice, and other food after this. For the shrimp sauce, they gave us soy sauce and wasabi. For me, I had my shrimps with Heineken.

Cooked Shrimps!

Overall, I had fun! Mixed feelings of excitement over the fishing activity but guilt for torturing shrimps (according to scientific studies, shrimps do feel pain). If I were to do this again, I would probably just behead them from the start and then bring over some pesto, chopped garlic, and lemon for marinade prior to grilling. Yum.

Quick recap of the whole thing!

Saturday, November 16, 2013

Hot Sweet Ginger Tea with Chia Seeds

I've been consuming chia seeds on a daily basis since my friend gave it to me as a gift. The other day, I passed by a stall that gave out ginger tea with chia seeds as a sample. It turned out pretty awesome! Because of that, I decided to make some for myself.

Ingredients
- a knob of ginger
- 1 tbsp of chia seeds
- 1 tsp brown sugar or honey (optional)
- 1 1/2 cups of water

Steps:
1. Boil the ginger, sugar/honey, and water to make the ginger tea.
2. Soak the chia seeds in half cup of water for about 5 minutes.
3. When it's ready, serve it in mugs and mix with chia seeds. Serve hot! :)


Thursday, October 24, 2013

Quick Apple Crumble!

I got inspired to try this after seeing it on a site that I now can't find. :( I dont remember my search keywords and I dont remember what it looked like. So now I'm posting it to keep it in memory.

This is a microwave recipe. I know there are anti-microwave people out there, i know you can use a normal oven with this, but I just don't have one with me now.

So here goes!

Ingredients:
- An apple
- 4 tbsp instant oatmeal (plain)
- 1 tbsp brown sugar
- a dash of cinnamon if you have it!
- 2 tbsp butter chunks
- dollop of plain yogurt or vanilla ice cream

Steps:
1. Chop the apples into .5 cm thickness
2. Place it around the bowl
3. Mix the oatmeal and sugar. Put on top of the apples. Sprinkle cinnamon if you have it.
4. Spread the butter chunks/dots around the top.
5. Microwave for a minute or 1 1/2 minutes. (Or put in an oven but I dont know yet for how long).
6. Put the yogurt or ice cream and dig in!

Tuesday, September 24, 2013

Poached Eggs on Top of Bacon-fat Toasted Bread

Kind of difficult to write an entry now on my phone... but i wanted to post my food pics here of the poached eggs, ham, salsa, amaranth, and bacon-fat toasted bread (unhealthy, I know).

As for the salsa I made, I made a jar-ful of it and ill be eating it throughout the week. I'm trying out some efficiency strategies these week to cut down on time required. :)


Monday, September 2, 2013

Beef Salpicao-style Marinated in Red Wine


Today, I cooked raw meat all by myself. I've always been used to veggies/fruits/canned stuff so preparing something out of raw meat is something new for me. I saw the chunk of raw tenderloin in the Supermarket today which costed roughly PhP 90, so I decided to try it out for today. 

All day, I was concerned if I was working with spoiled meat. Throughout the prep-work, I was checking online on how to know if the meat is spoiled. So far, it all boiled down to the smell. Mine didnt smell funky. The color was good too! The parts that were frozen had a deeper color but I knew it was of a different color because certain parts got frozen.

With the limited stuff available in the apartment kitchen, I just ended up grabbing again whatever was available. I used a Red Wine marinade recipe as a guide, though I didnt have everything.

So anyway, it turned out really well, so that's why I'm posting it here today!

Ingredients:
  • 8 oz tenderloin
  • 2 cloves of garlic, minced
  • 1 tbsp olive oil
  • 1/3 cup dry red wine
  • sprinkle salt and pepper
  • 1 tbsp rice vinegar
  • 1 tbsp Yakiniku sauce (i didnt have the Worcestershire sauce, so I ended up with this)
  • 1/2 tsp sugar


Procedure:
  1. Cut the beef into 1 inch by 1/2 inch (salpicao style).
  2. Mix everything together. Make sure to taste and adjust . Don't make it too salty.
  3. Marinate it for at least 2 hours, maximum 6 hours.
  4. When it's ready, put some olive oil in the pan at high heat. Put in the beef chunks one at a time. Flip it over once. It should get that crusty seared texture on the outside.
  5. For the sauce, pour the marinade into the pan to cook for about a minute. When it's done, pour over the beef.

Friday, February 1, 2013

Mushroom & Artichoke Cheese Bruschetta

Using the leftover stuff I had from last week's kitchen adventures, i merged them together with small toasted bread.


For the Artichoke Cheese Dip, click here

For the mushroom, I basically did the steps in the mushroom soup prep up until the soup stock gets poured in. The only thing I forgot was the salt which should have been at the beginning when i first added the mushrooms. Plus I added some truffle oil (3 drops), chilli flakes, and a bit of soy sauce.


Ingredients:

  • 2 packs of white button mushrooms (230g each)
  • 1 clove of garlic, whole, uncrushed
  • 1 small purple onions, chopped
  • 2 tbsp butter
  • a dash of dried thyme
  • 3 drops of truffle oil at the end
  • salt and pepper
  • a dash of tabasco or a dash of chilli flakes
  • Small pieces of bread (around 2 inches wide)
  • 1 oz of Artichoke Dip
  • 5 small pieces of bread


How to:

  1. Put the butter, mushrooms, a big pinch of salt in a soup pot at med-high heat
  2. Keep stirring, the juices will eventually come out.
  3. Wait for the juice to evaporate mostly and the mushrooms are now brown.
  4. Turn down to med-low heat. Added the onions and saute until clear.
  5. Add the herbs, clove of garlic, and the chicken stock and water.
  6. Toast the bread, add a dollop of the artichoke cheese, top with the sauteed mushrooms.


Sunday, January 27, 2013

Trying out the Roasted Garlic Vinaigrette

When I got home from playing Kinect with my friends, I saw my brother preparing salad greens. He didn't have any dressing yet. I thought to myself: "Why not make the roasted garlic vinaigrette dressing that I saw from Gordon Ramsay's show?"

But then at this moment, i didnt have the recipe. I found a version from another blog here in Fat Girl Trapped in a Skinny Body. I used that as a guide.


Salad greens, sliced strawberries, blocks of cheddar, and roasted garlic vinaigrette

Here's what I ended up using and how it ended up...


The ingredients

Ingredients for the Roasted Garlic Dressing:
  • 1 whole head of garlic
  • 1/8 cup of apple cider vinegar
  • 1/8 cup of maple syrup (it should be honey, but we only had this)
  • 1/4 cup of olive oil
  • small squeeze of mustard (just a little bit, optional)
  • A pinch of salt
  • A dash of pepper

How to:

  1. Slice the garlic in half cross-wise, brush the top with olive oil. Sprinkle some salt and pepper and cover with aluminum foil. Covering it with aluminum foil helps the heat get evenly distributed and prevents the garlic from being "crunchy" after being cooked.
  2. Put it in the oven for 25 minutes (in our case, we used the toaster). When it's done, wait for it to cool before touching. Make sure the garlic is golden brown.
  3. When it was done, we took out the garlic meat and mixed it in with the rest of the liquid ingredients. The garlic meat got smashed and the whole thing became creamier.
  4. Pour it on top of the salad greens and toss!


1) Prepare the garlic for baking 2) Bake the garlic for 25 minutes 3) Mix it all in together with the garlic 4) Chopped up cheddar cheese and strawberries for the salad.

Here's my brother's plate! For the salad, I wished we added something crunchy like nuts or bacon... the cheese and strawberries weren't enough.

Wednesday, January 23, 2013

Cream of Mushroom Soup (Inspired from Food Wishes)

Finally, we got some mushrooms! I've been meaning to try to make the mushroom soup from Food Wishes. My brother went grocery shopping and found some white button mushrooms. 1 package was Php 115 in S&R.

I served the soup to my family as midnight snack. They all said it was good! Probably because it's pure mushroom, not the flour-based cheap stuff you find in cans or in fast food joints. Or maybe they were just being nice (?).

Cream of Mushroom Soup with pepper on top


See the foodwishes video at this link so you can see the a professional do it. Chef John demonstrates it in a form of a video so it's best to watch his to learn all the details.

For my rookie version, see the photos below. Mine is a different version, because of limitations on what we have here.

Ingredients:

  • 2 packs of white button mushrooms (230g each)
  • 1 clove of garlic, whole, uncrushed
  • 2 small purple onions, chopped
  • 2 tbsp butter
  • 1 tsp of flour
  • 1 can of chicken broth
  • 1/4 cup of water
  • 3 tbsp cream (didn't want it to be too much)
  • a dash of dried thyme
  • a small sprig of rosemary
  • 3 drops of truffle oil at the end
  • salt and pepper


Procedure:

Some of the ingredients: White button mushroom, a can of chicken broth, small sprig of rosemary


1) Put the butter, mushrooms, a big pinch of salt in a soup pot at med-high heat. 2) Keep stirring, the juices will eventually come out. 3) The juices evaporate and the mushrooms are now brown. 4) Turn down to med-low heat. Added the onions and saute until clear. Add the 1 tsp of flour and mix with the remaining liquids. Add the herbs, clove of garlic, and the chicken stock and water.


I left this soup simmering for about 40 minutes to an hour (with a lid), stirring every now and then, while I check work emails and while I take a call from work.


After the soup is finished simmering, let it cool down first. Our blender container is plastic, so I can't put the soup in when it's too hot. I filled it up only to 1/4 of the container so it doesn't spill everywhere when I start to blend.  It should look like that in the right when it's finished.

When I was done blending, I put it back in the soup pot. I added a bit of cream after. When it was ready to serve, I reheated it in the stove at med-low heat.

Finished! Mushroom soup for 4 people. :) Enough for 4 small bowls or  2-3 big bowls.

I got some help from my brother. He knows his way around our kitchen a lot more than I do. Like how to turn on the stove, or where to find out flour...


Tuesday, January 22, 2013

Artichoke Cheese Dip!

Because the canned artichokes at home have been left untouched for a long time, my mom asked me to use it soon.

I searched for a recipe... this one is inspired by Chef John's (Food Wishes) Hot Artichoke Dip. I say "inspired", because I don't have all of the same ingredients so it's not an exact copy.

Also, I used the microwave for cooking throughout. :) No oven and stove. In our kitchen, I only know how to get the microwave started.

With the cheese all melted together with the artichoke,  put it in a smaller container and gave it to my parents

Ingredients:
  • 1 can of artichokes, drained and roughly chopped
  • Some leeks, I only had 1/4 cup
  • 2 cloves of garlic, finely chopped
  • 2 tbsp of butter
  • 3 fresh basil leaves and a few fresh rosemary
  • Half a block of cream cheese, though ideally a full block
  • 1 tbsp of mayonnaise (if you don't have enough cream cheese)
  • 1/4 cup parmesan cheese
  • Half a block of grated cheddar cheese


1) Roughly chop the canned artichokes. 2) Chop the leeks, garlic, rosemary, basil and saute with butter (details below).
3) Mix in everything else. 4) Microwave together until the cheddar melts and keep mixing it all together.

Procedure:
  1. Roughly chop the drained artichokes and put into a mixing bowl.
  2. On a different small microwavable bowl, add in the leeks and butter first and cook in the microwave for 20 seconds. Add the garlic, basil, rosemary into the bowl and microwave for another 20 seconds. When done, pour into the chopped artichokes.
  3. Fold in the cream cheese, mayo (optional), parmesan cheese, and cheddar cheese. Make sure everything is mixed well.
  4. Microwave together for 1 minute until the cheddar melts. Mix it all together so the cheese mixture becomes smooth.
  5. To serve, transfer into a small bowl. Ideally, I should have put it in a small ramekin and added some extra cheese on top for presentation purposes, but I didn't have time.

Sunday, November 18, 2012

Italian Cooking Spree: We made Chunky Tomato Soup

As part of the Italian Cooking Spree, we made Chunky Tomato Soup. Now, I've been making the tomato cream soup for a long time, and I should probably try something else. RJ says that I need to branch out because I keep going back to Tomato Soup. :P

However, for now, I'm writing about it again, because I really liked this version better with the chunky bits! We thought we had a blender already, but turns out we don't. In the end, it turned out better than expected because the chunkiness made it rich.

The inspiration for this particular recipe comes from Laura Vitale. You can find her recipe and video in the link here: http://www.laurainthekitchen.com/all/episode.php?episodenumber=454

What you'll find below is our version... developed because we adapted to what's available (in Cherie's house and in the supermarket we went to).

The chunky tomato soup up close, with the addition of fresh spring onions from the garden the day after

Again, credits to Tine for the photos of the cooking process. :) Thank God for your camera!


Ingredients:
  • 3 Tbsp of Extra Virgin Olive Oil
  • 1 Small Onion, chopped
  • 2 Cloves of Garlic, minced
  • 2 lbs of Ripe Tomatoes
  • 1 32 oz Can of Canned Tomatoes (whether whole or diced, it's fine)
  • 1 1/4 cups of Chicken Stock (we used 2 cups of water plus 1 chicken bouillon cube)
  • 1/2 cup of Heavy Cream
  • 1 Tbsp of Balsamic Vinegar
  • 1/4 cup of Fresh Basil Leaves (we didn't have it that day, but I added it on the leftovers)
  • Salt and Pepper, to taste
  • Some dried herbs and chilli flakes for seasoning in small quantities

How-to:

1) Preheat the oven to 425 degrees. Chop the onions. Do all the needed prep work.

Adrin, here, is good at chopping the garlic and onions

2) Slice the tomatoes in half and put them on the baking sheet or pan. Pour the olive oil, salt, and pepper all over them and toss it all together so each one gets coated with the fair share. Make sure they arrange in one layer so they roast evenly (Lesson Learned). Roast them for about 25 minutes. (Laura Vitale added the balsamic vinegar here, but we didn't know we had it until later.)


3) In the large pot, sautee the chopped onions in the olive oil until they get a golden brown color, add the garlic and cook for 1 more minute.

4) We added the bouillon cubes and the water and put the heat at medium-high. Allow the mixture to come to a boil to make sure the cube is fully dissolved. Add the canned tomatoes and simmer at medium heat.

5) We took out the tomatoes and chopped them into smaller bits and dunked it in the soup. (At this point, we realized we didn't have a blender! Oh no...) So this is where the tomato-crushing efforts came in. See the photo below on how we did it. This is where I also added the balsamic vinegar.


We sifted off a lot of the chunks and forced it through the strainer. For the remainder, we continued to crush it and chop it up some more (pinanggigilan-chopping). and then forced it through the strainer again.

6) After finishing with the tomato-crushing efforts, let the soup simmer for around 15 minutes. We added a small handful of dried rosemary (feedback was not to add because it's hard to chew and swallow) and some dried chilli flakes. In the end before serving it, add the 1/2 cup of heavy cream and mix it together. Unfortunately, ours didn't dissolve all that well without the blender (i heard you had to "temper" it)... but it still tasted great!

So here's what we ended up with... Chunky tomatoey goodness! :)


Yum :)


Italian Cooking Spree: We Made Easy Tiramisu

Yesterday, I got together with other people from work (there were 7 of us) to sharpen our cooking skills. The theme for this Saturday was Italian where we made Carbonara, Tomato Soup, and Easy Tiramisu. This particular entry will be dedicated to the Tiramisu.

Some few words about this: There was too much coffee liquid such that there was a lot of liquid left behind in the tray. This dessert was named "Tiramisoup" :) It didnt affect the taste of the texture, but the excess liquid was just weird to look at. I guess the only way to avoid this would be to really quickly dip the ladyfingers in the coffee so they don't absorb too much liquid. [Lesson Learned]

Up close on a slice of our Easy Tiramisu :P

Since it's our first time making this, we needed to find something easy. This particular recipe, called "Easy Tiramisu", we based it from this site: http://m.allrecipes.com/recipe/23143/recipeeasy-tiramisu

Since we weren't able to get the mascarpone cheese in the average supermarket here in Manila, we had to go for a substitute. It ended up quite good so no regrets on using a mascarpone substitute! For the mascarpone cheese substitute, we got it from this site:  http://allrecipes.com/recipe/mascarpone-substitute/

The photos of the creation process are all thanks to Tine!

Ingredients:
  • 1 (8 ounce) package cream cheese, softened
  • 1/4 cup heavy cream
  • 2 tablespoons butter, softened
  • 3 egg yolks
  • 1/4 cup sugar
  • 2 teaspoons vanilla extract (we forgot this one)
  • At least 24 ladyfingers (also known as Broas here in the Philippines, produced by FMC)
  • 1 crushed ladyfinger for topping
  • Cocoa for sprinkling (optional)
  • 1 1/2 cups brewed coffee for dipping

How-to (or What Happened):

1) Tine and Adrin started mixing together the 8 oz. softened cream cheese, with the 1/4 cup of whipped cream (we used Anchor) and the 2 tbsp of softened butter. They mixed it together using the electric mixer. We now have our mascarpone cheese substitute!

2) Afterwards, they mixed 1/4 cup sugar (we used brown because we were out of white, no regrets in using brown) with 3 egg yolks -- don't forget to make sure there's no egg shells. I bit into one in some part, but it was a really small piece. After that, it went into the cream cheese mixture. We forgot to add the 2 tsp vanilla extract, my bad. :( After everything is mixed up, leave it aside.

3) Now, it's Cherie, Fran, and Jester's turn. Fran and Jester brought the coffee where the ladyfingers needed to be dipped in. In a bowl, they poured in the 1 1/2 cup brewed coffee. Each lady finger was dipped briefly in the coffee (be quick about it, because they break easily; use a big spoon just like in the photo below). After dipping, it was arranged in our 8x8 pan.

4) When the 8x8 pan is covered in soaked ladyfingers, we added a layer using half of the cream cheese mixture. We added another layer of the soaked ladyfingers on top of the cream cheese. When it's all filled up, we poured in the remaining cream cheese.

5) Using what was left of the ladyfingers, we crushed some bits as toppings over the cream cheese mixture. When it was done, we popped it in the fridge to chill for an hour!

So to summarize steps 3-5, here it is:

Dip, Arrange, Layer (2x), then top off with crushed ladyfingers

So here's the gang that worked on the Tiramisu (along with the Tomato Soup and the Carbonara). I'll be writing next about the Tomato Soup and the Carbonara.

L-R: Jester, Cherie, me, Fran, Tine, RJ (Adrin was behind the camera)

Sunday, October 28, 2012

Potluck and Quick Easy Tomato Cream Soup Recipe

Porkchops, Tomato Cream Soup, Wine, Whoppers, Havannets for Dinner

My friends and i got together for a "potluck". Chux made barbecue porkchops and brought red wine. Lance brought Hershey's Whoppers Ice Cream. Debbie brought Havannas all the way from Argentina! I made Tomato Cream Soup. :D We watched Friends with Benefits after (Mila Kunis and Justin Timberlake).

So here I am - sharing the quick and easy recipe for tomato cream soup! It's quick, easy... this is the shortcuts and cheats version. It's not exactly healthy since I just used bouillon cubes (high sodium) instead of chicken stock, but I needed something quick.

Ingredients (Serves 4-6):

  • 3 cups of water
  • 1 chicken bouillion cube (or more, if you feel like it)
  • 1 big can of tomatoes (sometimes i use diced, sometimes whole - i prefer whole)
  • 2 cloves of garlic and 1 small onion chopped
  • 1 pack of all purpose cream
  • a teaspoon of dried rosemary (or anything you feel like adding, maybe basil)
  • freshly ground black pepper and extra virgin olive oil at the end
  • Croutons (my friends requested for croutons but I didn't have any)


How to:

  1. Dissolve the bouillon cubes with the water in a soup pot and let it boil in medium heat
  2. Add the canned tomatoes in with rosemary and the chopped onions and garlic. Let it simmer for 5 minutes.
  3. Turn off the heat and wait for it to cool a bit. Add the cream in and mix.
  4. When it's not boiling-hot anymore, transfer it to a blender but only up to half of the blender at a time to prevent it from spilling when you blend. Transfer the blended soup into a soup bowl.
  5. Once everything is blended, it's ready to be transferred into the smaller bowls.
  6. Add black pepper and a little bit of extra virgin olive oil on top. If someone requested for croutons, add it as well. :)

UPDATE!!! [Nov 18] Here's an even better recipe for the Tomato Soup, but it would take a lot more effort than this one. http://myhobbycollection.blogspot.com/2012/11/italian-cooking-spree-we-made-chunky.html