Wednesday, June 12, 2013

Painting Ceramics at Color Me Mine Hobbes & Landes

As early as I could, I influenced my niece to like artsy craftsy stuff. When she was around 3, I started bringing her to the Color Me Mine section of Hobbes and Landes.

Our most recent trip was to paint an angel. She's now into the more-complicated stuff. We started before with small and simple fishes or butterflies. The plaster figurines range from 300-1000 Php, depending on the size and complexity. There's also a painting and baking fee which is about 180 Php, if I remember correctly.

Here's photos of our most recent Angel figurine!

We first choose the figurine we want to paint


They lent us their tools and they gave us paint. We get to choose 5 at a time. My niece really wanted purple & pink.

Here's what it looks like after we finish painting! But we can't take it home yet...

We left it with Hobbes & Landes for glazing. General waiting time is 3 weeks.
When it comes back, it's all shiny and the colors are more vibrant.. :)

Here's what their station looks like. Lots of figurines and paint to choose from!


Here's some of the old stuff she did. We've done a lot more, but these were the only ones which I still had in my phone.

Here's a fairy

Freaky fish?


You can visit their international site at http://www.colormemine.com

Kaleidoscope-Kit from the Art Garden

Isn't it pretty? It's what it looks like through the kaleidoscope I made from the Kaleidoscope-Kit I got from the Children's Art Museum I visited in Singapore (Art Garden).


They gave us a kit (see below). It contains 3 pieces of something-like-glass (something not easily breakable). In each piece, there was a double-sided tape stuck to it. There was also a piece of paper where I stuck each glass-piece. After folding everything together as if it were a triangular tube, I now have my kaleidoscope! I guess I still need to color the exterior... it still looks so plain!


I got 2 kits, because the friend I went with wasn't interested in making one for herself. Now, I'm saving it for when my niece comes around in the weekend.

Here's a bigger photo of the view from the kaleidoscope. :)


To know more about the Art Garden in the Singapore Art Museum, visit here - http://www.singaporeartmuseum.sg/exhibitions/details.php?id=114

Tuesday, April 9, 2013

Idea! Rib Eye Steak with Bacon Bits

Last Sunday was my mom's birthday.

The whole family went out for dinner buffet in Paseo Uno (thanks to Dealgrocer for the discount).

One of the dishes I kept coming back for was the Rib Eye steak station. I had 3 slices! (I also love their fish masala, but that's not what I'll be sharing here).

I love love steak. And I love love love bacon! So at the steak station, they had the baked potatoes station nearby. I thought to myself: If the toasted fat of the steak tastes like bacon, why not add it in?

So I proceeded to topping my steak with bacons bits! Here's a picture...

YUM! #thisiswhyimfat


It's a more sinful and fattier version of the fillet mignon! :P


Newel Kena Rags2Riches Bag

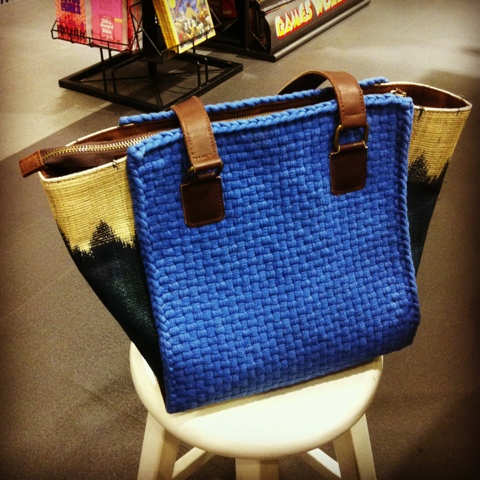
Throughout the month of March, I've been itching to buy a new bag. After searching online all over, I ended up obsessing for 3 days of the Holy Week holiday over the bags from Rags2Riches (http://www.rags2riches.ph).

[It's been a month since I made my last entry. I haven't done much except work and watch tv series... and go out and eat with friends... not much time to write before.

I've asked my friends and family for their opinions... I've gone through online shopping sites Zalora, Ava, and the R2R site itself! I ended up buying from the Aranaz store in Powerplant Mall because I didn't want to pay for the shipping fees and I wanted the blue one.

So here it is! Isn't it pretty?

I use it now as my main bag for work and weekends. It goes well with jeans!

At the first day, I thought it was kind of heavy. The blue weave fabric is quite thick. After that, it's not so heavy anymore.

For the t'nalak weaves at the sides, it will tend to fray so be careful with it.


The bags are made by artisans from not so well-off communities in the Philippines and they get paid fairly for it (not get exploited by middle-men). Normally, they would be forced to work for 70php a week (that's already a meal for the average Makati person). With Rags2Riches, they have the opportunity to get 1000php a week.

The materials they use are also upcycled. The fabric used in making the weaves are scraps.

Read more about their story here.

Moving forward, I'll be more conscious about the things I buy... if there is an eco-ethical and fair trade alternative, I'll veer towards that instead, though not necessarily cheaper. Normally, I would go for low-cost... but you never really know if it's cheap because someone got poorly-paid for it along the way.

Friday, February 1, 2013

Mushroom & Artichoke Cheese Bruschetta

Using the leftover stuff I had from last week's kitchen adventures, i merged them together with small toasted bread.


For the Artichoke Cheese Dip, click here

For the mushroom, I basically did the steps in the mushroom soup prep up until the soup stock gets poured in. The only thing I forgot was the salt which should have been at the beginning when i first added the mushrooms. Plus I added some truffle oil (3 drops), chilli flakes, and a bit of soy sauce.


Ingredients:

  • 2 packs of white button mushrooms (230g each)
  • 1 clove of garlic, whole, uncrushed
  • 1 small purple onions, chopped
  • 2 tbsp butter
  • a dash of dried thyme
  • 3 drops of truffle oil at the end
  • salt and pepper
  • a dash of tabasco or a dash of chilli flakes
  • Small pieces of bread (around 2 inches wide)
  • 1 oz of Artichoke Dip
  • 5 small pieces of bread


How to:

  1. Put the butter, mushrooms, a big pinch of salt in a soup pot at med-high heat
  2. Keep stirring, the juices will eventually come out.
  3. Wait for the juice to evaporate mostly and the mushrooms are now brown.
  4. Turn down to med-low heat. Added the onions and saute until clear.
  5. Add the herbs, clove of garlic, and the chicken stock and water.
  6. Toast the bread, add a dollop of the artichoke cheese, top with the sauteed mushrooms.


Sunday, January 27, 2013

Trying out the Roasted Garlic Vinaigrette

When I got home from playing Kinect with my friends, I saw my brother preparing salad greens. He didn't have any dressing yet. I thought to myself: "Why not make the roasted garlic vinaigrette dressing that I saw from Gordon Ramsay's show?"

But then at this moment, i didnt have the recipe. I found a version from another blog here in Fat Girl Trapped in a Skinny Body. I used that as a guide.


Salad greens, sliced strawberries, blocks of cheddar, and roasted garlic vinaigrette

Here's what I ended up using and how it ended up...


The ingredients

Ingredients for the Roasted Garlic Dressing:
  • 1 whole head of garlic
  • 1/8 cup of apple cider vinegar
  • 1/8 cup of maple syrup (it should be honey, but we only had this)
  • 1/4 cup of olive oil
  • small squeeze of mustard (just a little bit, optional)
  • A pinch of salt
  • A dash of pepper

How to:

  1. Slice the garlic in half cross-wise, brush the top with olive oil. Sprinkle some salt and pepper and cover with aluminum foil. Covering it with aluminum foil helps the heat get evenly distributed and prevents the garlic from being "crunchy" after being cooked.
  2. Put it in the oven for 25 minutes (in our case, we used the toaster). When it's done, wait for it to cool before touching. Make sure the garlic is golden brown.
  3. When it was done, we took out the garlic meat and mixed it in with the rest of the liquid ingredients. The garlic meat got smashed and the whole thing became creamier.
  4. Pour it on top of the salad greens and toss!


1) Prepare the garlic for baking 2) Bake the garlic for 25 minutes 3) Mix it all in together with the garlic 4) Chopped up cheddar cheese and strawberries for the salad.

Here's my brother's plate! For the salad, I wished we added something crunchy like nuts or bacon... the cheese and strawberries weren't enough.

Kinect at the New Eagles Nest in Banawe

We got invited to the new Eagles Nest. It used to be in Amoranto St. but it was moved to 168 Apo St. They've got Magic Card games and Kinect games. It's not open yet, but it will be open soon!

Here's a couple of photos of us playing Just Dance, Dance Central, and the Avengers.

Playing the various songs in Just Dance


Watching people dance is entertaining

Do the Hustle!


Teach me how to dougie!

I forgot which song this was

Playing Marvel Avengers!

Friday, January 25, 2013

Dulce de Leche Cheesecake from Pino

I love this. I love that it's just right, not too sweet, and that the chocolate covered cherry didn't conflict with the cheesecake taste.

The chocolate syrup on the caramel sauce looks like tiger stripes. Wala lang.

Php 165 in Pino Bar

Wednesday, January 23, 2013

Cream of Mushroom Soup (Inspired from Food Wishes)

Finally, we got some mushrooms! I've been meaning to try to make the mushroom soup from Food Wishes. My brother went grocery shopping and found some white button mushrooms. 1 package was Php 115 in S&R.

I served the soup to my family as midnight snack. They all said it was good! Probably because it's pure mushroom, not the flour-based cheap stuff you find in cans or in fast food joints. Or maybe they were just being nice (?).

Cream of Mushroom Soup with pepper on top


See the foodwishes video at this link so you can see the a professional do it. Chef John demonstrates it in a form of a video so it's best to watch his to learn all the details.

For my rookie version, see the photos below. Mine is a different version, because of limitations on what we have here.

Ingredients:

  • 2 packs of white button mushrooms (230g each)
  • 1 clove of garlic, whole, uncrushed
  • 2 small purple onions, chopped
  • 2 tbsp butter
  • 1 tsp of flour
  • 1 can of chicken broth
  • 1/4 cup of water
  • 3 tbsp cream (didn't want it to be too much)
  • a dash of dried thyme
  • a small sprig of rosemary
  • 3 drops of truffle oil at the end
  • salt and pepper


Procedure:

Some of the ingredients: White button mushroom, a can of chicken broth, small sprig of rosemary


1) Put the butter, mushrooms, a big pinch of salt in a soup pot at med-high heat. 2) Keep stirring, the juices will eventually come out. 3) The juices evaporate and the mushrooms are now brown. 4) Turn down to med-low heat. Added the onions and saute until clear. Add the 1 tsp of flour and mix with the remaining liquids. Add the herbs, clove of garlic, and the chicken stock and water.


I left this soup simmering for about 40 minutes to an hour (with a lid), stirring every now and then, while I check work emails and while I take a call from work.


After the soup is finished simmering, let it cool down first. Our blender container is plastic, so I can't put the soup in when it's too hot. I filled it up only to 1/4 of the container so it doesn't spill everywhere when I start to blend.  It should look like that in the right when it's finished.

When I was done blending, I put it back in the soup pot. I added a bit of cream after. When it was ready to serve, I reheated it in the stove at med-low heat.

Finished! Mushroom soup for 4 people. :) Enough for 4 small bowls or  2-3 big bowls.

I got some help from my brother. He knows his way around our kitchen a lot more than I do. Like how to turn on the stove, or where to find out flour...


Tuesday, January 22, 2013

My Niece's Make A Ballerina Frame

My niece brought over her new toy, called "Make A Ballerina Frame". Essentially, it's a small picture frame that you can make from plaster. The box contains a packet of plaster, mold, paint, brush, adhesives, cardboard, and glitter.

Tips when making this:

  • Use half of the plaster powder. You don't need the entire thing for such a small container. We ended up wasting the other half, when we could have just made 2 frames.
  • Check the bottom of the container if there are bubbles. Having bubbles prevents that "smooth" look. Tapping the container carefully removes the bubbles. Just be careful not to spill.
  • We used clear nail polish on some areas to highlight and so that the glitters stick on it. It adds to the sparkle. ;)
  • The adhesives don't stick too hard. It didn't help that my niece kept touching the adhesives so it lost some of its stickiness. Maybe use mighty bond so the back really sticks.

It brought out the OC-ness in me, which didn't go so well with my niece because I got too overbearing that she cried when I got upset over the glitter mess... (meanie!) Next time, i'll keep my hands to myself and help her only when she asks for it.

See photos below:

After getting it out of the mold, we weren't able to get rid of some of the edges


My niece painting, snug on the floor
This is how I guess it's supposed to look like

The finished product! Cute shiny ballerina! No photo yet. :P